
Your iPhone Won't Turn On? – Here’s Exactly How to Fix It (All Models)

You press the side button on your iPhone. Nothing. You press it again, maybe hold it down for good measure. Still nothing. Just a dead, black, stubbornly unresponsive screen staring back at you.
That sinking feeling? Yeah… I know it all too well. Nowadays a dead phone really sucks: it’s your wallet, your camera, your connection to friends, family, and work, suddenly reduced to a sleek, expensive paperweight. And as someone who believes tech should be durable and functional, a device that just gives up the ghost is a no-go.
But at least here’s the good news. Before you book an appointment at the Genius Bar or start shopping for a replacement, know this: a "dead" iPhone is very often not dead at all. A lot of the time, the fix is something you can do yourself, right now, without losing a single photo or message.
So, let's walk through it together. We’ll start with the simple, surprisingly common fixes and work our way up. No panic necessary.
I. What to Try First When Your iPhone Won’t Turn On
These initial steps are completely non-invasive – meaning they won't touch your data – and solve the problem more often than you'd think. Give these a solid try before moving on.
1. Power Check: Is Your iPhone Just Out of Juice?
I know it sounds obvious. Almost too obvious. But you have to start here. A completely drained battery won’t let the phone show any sign of life, not even the "please charge me" icon.
Plug it in. But don’t just plug it in and expect an instant miracle.
In my experience, you should give it at least 30 minutes. Apple’s official advice is to wait up to an hour. For the first several minutes, that screen might stay completely black while the battery sips just enough power to wake up. If you eventually see the low-battery icon, that's a great sign. It means the phone is alive, just thirsty.
Now, if nothing happens after 30 minutes, we need to check the entire power chain.
The Port
This is my number one suspect, always. I can’t tell you how many times a friend’s "broken" phone was just a victim of pocket lint. Grab a non-metallic tool – a wooden or plastic toothpick is perfect – and gently scrape out the inside of the Lightning or USB-C port. You would be shocked at how much dust and debris gets compacted in there, preventing the cable from making a solid connection.
The Cable & Adapter
Look closely at your cable. Are there frays near the ends? Kinks? A bent pin? The slightest damage can stop it from working correctly. To be sure, try a completely different cable and power adapter. And while I’m all for saving a buck, cheap, non-certified cables or adapters are a classic case of false economy. They often lack the proper circuitry for safe charging, which at best means they fail quickly, and at worst, they can damage your iPhone's internals. It’s just not worth the risk.
Honestly, this is one of those areas where I always recommend sticking with original Apple products or at least MFi-certified gear from reputable brands. The peace of mind you get is worth the few extra dollars, especially when the alternative could be a fried logic board.
To help you cut through the noise, I’ve compiled the official Apple cables and power adapters that I personally use and recommend below. It’s the simplest way to guarantee you’re using gear that’s built to last and designed to protect your device.


The Outlet
Finally, make sure the wall outlet itself is working. Plug a lamp into it or something. Or better yet, try a USB port on a computer you know is on and awake.
If you’ve checked all that and you're still staring at a black screen, it’s time for the next step.
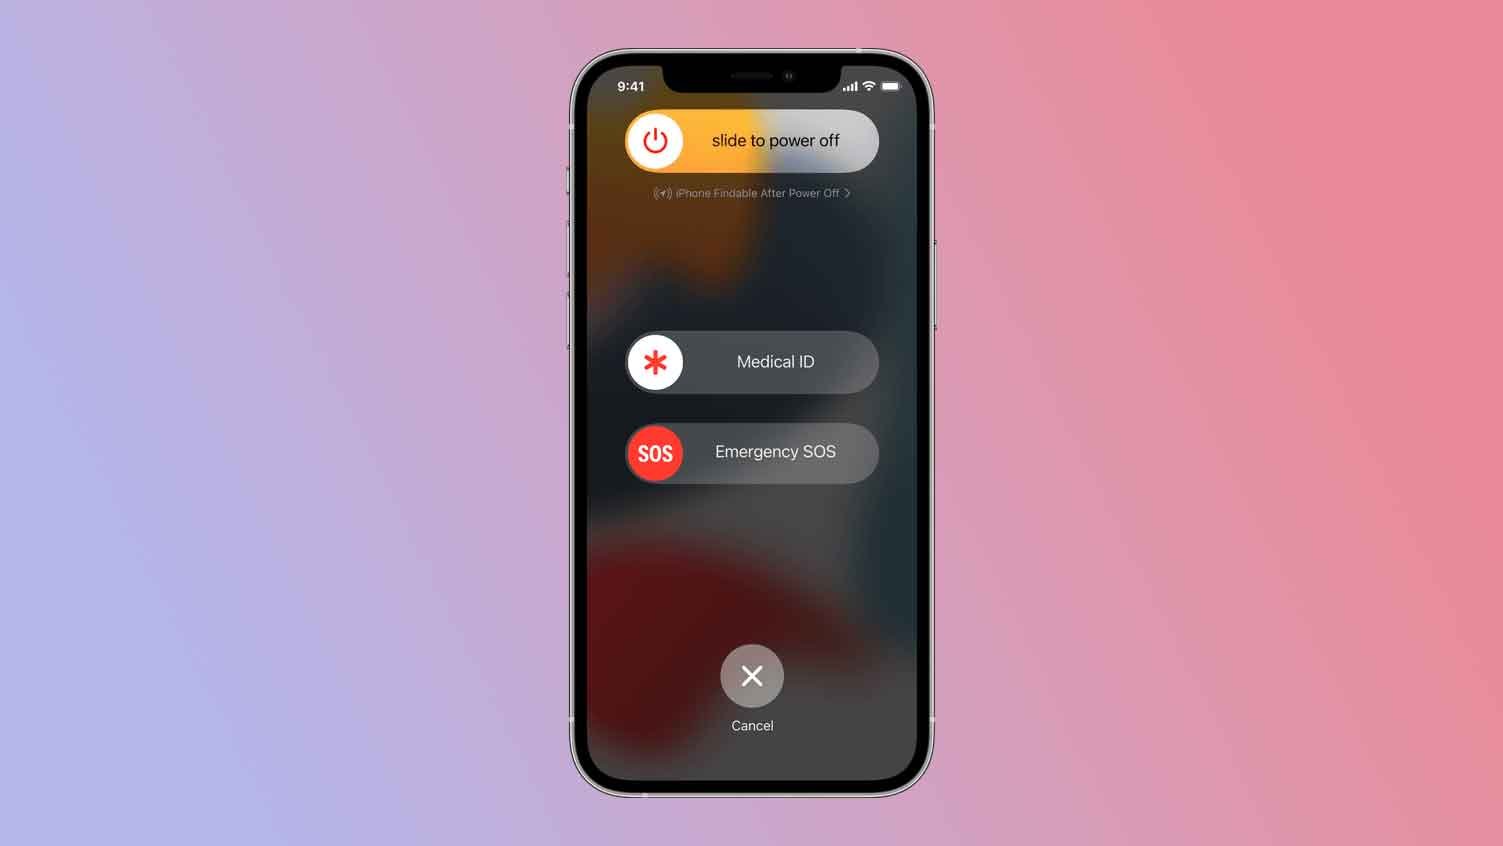
2. Perform a Force Restart (Hard Reset)
If the issue isn't power, it's likely a software crash. The iOS on your phone has frozen so completely that it can't even respond to a normal power-off command. This is where the force restart – or also known as hard reset – comes in.
You can pretty much think of it as the digital equivalent of a firm but friendly slap on the back. It cuts the power to the logic board for a split second, forcing the entire operating system to reboot from scratch. This will not delete your data. It's just a more powerful way of turning it off and on again, designed specifically to shake out these kinds of deep freezes.
Apple, in its “infinite wisdom”, has changed the button combination over the years, mostly to avoid conflicts with features like Emergency SOS. Using the right one is key.
Here’s a quick breakdown for you:
| iPhone Model(s) | The Button Sequence You Need |
|---|---|
| iPhone 8, SE (2nd gen & later), X, and all newer models (11 through 16 Series) |
This is a three-step process: 1. Quickly press and release Volume Up. 2. Quickly press and release Volume Down. 3. Press and hold the Side Button (the power button). Keep holding it. Don't give up. |
| iPhone 7 & 7 Plus | This one's a bit simpler: Press and hold both the Side Button and the Volume Down Button at the same time. |
| iPhone 6s, SE (1st gen) & earlier | Press and hold both the Home Button and the Top (or Side) Button simultaneously. |
For all of these, the confirmation cue is the same: keep holding the button(s) until you see the Apple logo appear on the screen. This can sometimes take 10–15 seconds of holding, so be patient. If that logo pops up, you’re likely back in business.
Still nothing? Let's check one more thing.
3. Temperature Check: Too Hot or Too Cold?
iPhones are a bit like us – they have a preferred temperature range. Officially, it’s between 32° F and 95° F (0° C and 35° C). Go too far outside that, and the phone will protect itself by shutting down completely.
This happens most often with heat. Ever leave your phone on a car dashboard in the sun or game for an hour straight with a thick case on? It can get hot enough to trigger a thermal shutdown. If you suspect this is the case:
Move it to a cooler spot, out of direct sunlight.
Pop it out of its case to let it breathe.
Just let it be for a good 30 minutes to cool down naturally.
This is a common issue, and if you find your iPhone overheating regularly, there are deeper causes and solutions worth exploring.
A crucial warning here: Never, ever put an overheated iPhone in the refrigerator or freezer. The rapid temperature shock can cause condensation to form inside the phone, leading to permanent liquid damage. That’s a much more serious problem.
The opposite is also true. Extreme cold can temporarily kill your phone. The chemical reactions inside the battery slow down so much in freezing temperatures that the battery's internal resistance spikes, preventing it from delivering enough power to even start up. The fix is simple: bring it inside and let it warm up to room temperature before you try charging or turning it on again.
II. Advanced Software Solutions

Alright, so the quick fixes didn't pan out. Your iPhone is still stubbornly refusing to join the land of the living.
Don't worry. We're not out of options yet, but we do need to go a level deeper. This is where we bring in your computer. The following steps involve connecting your iPhone to a Mac or PC to perform more serious software resuscitation.
This is also where I have to give the big disclaimer: from here on out, there's a genuine risk of data loss. It’s moments like these that reinforce my belief that a good backup strategy isn't just a ‘nice-to-have’ but an absolute necessity for peace of mind. If you can get your phone working, make backing up a regular habit.
1. Black Screen vs. Apple Logo Loop
The way your iPhone is failing can give us big clues about what's wrong. It usually falls into one of two camps:
The "Zombie" Phone (aka “Black Screen of Death”)
This is when the screen is totally black, but you suspect the phone isn't completely dead. Maybe you plug it in and hear the faint "ding" of it connecting to power. Or you flip the silent switch and feel a slight vibration. This is actually a good sign. It suggests the core hardware is getting power, but a major software crash or a firmware glitch is preventing the display system from firing up.
The Boot Loop
This one is maddeningly common, and I often see it happen after a botched software update. The phone tries to start, you see the Apple logo for a few seconds… and then it goes black and starts all over again. And again. And again. It's stuck in a loop because a critical file in the main operating system (iOS) is corrupt, preventing it from finishing its startup sequence.
If you're seeing either of these signs, it's time to try Recovery Mode.
2. Recovery Mode
Recovery Mode is a special troubleshooting state that allows your computer to establish a direct line to your iPhone, even when iOS itself is too broken to load. It works because it's handled by a piece of software that runs before the main operating system even tries to start.
Here’s how you use it:
Grab your USB cable and plug your iPhone into your computer.
Open Finder if you're on a Mac running macOS Catalina or later. If you're on a PC or an older Mac, open the Apple Devices app or the latest version of iTunes.
Now, you're going to perform the same force restart combo we covered in section I. 2. But here’s the crucial difference: DO NOT LET GO when you see the Apple logo. Keep holding that final button.
You’ll know you did it right when a new screen appears on your iPhone – one showing a picture of a computer and a cable. You can release the button now.
Your computer should immediately pop up a dialog box. This is the most critical moment of the entire process. You will see two options: Update or Restore.
Let me be perfectly clear: ALWAYS, ALWAYS, ALWAYS CHOOSE "UPDATE" FIRST.
Update
This choice tells your computer to reinstall a fresh copy of iOS while leaving all your personal data – photos, messages, apps, settings – exactly where it is. It’s the data-safe option designed to fix the broken operating system without wiping your life from the device. This feature is a huge improvement from the old days when nearly every major software issue required a full wipe.
Restore
This is truly the last step. If you choose this, or if the "Update" process fails, "Restore" will completely erase every single piece of data on your iPhone and return it to factory settings. It’s a last resort. Without a recent backup, everything will be gone for good.
3. Emergency DFU Mode: Use Only If Nothing Else Works
So, Recovery Mode didn't work. The update failed, and you're still looking at a bricked phone. There is one final software trick up our sleeve, but it comes with serious warnings.
Welcome to DFU Mode.
DFU stands for Device Firmware Update, and it's the deepest software restoration you can perform. This is what technicians at the Apple Store often turn to when things are really bad. It bypasses even more of the iPhone’s startup software than Recovery Mode, allowing a computer to interface directly with the hardware's most fundamental programming.
The key signal that you’ve successfully entered DFU Mode is this: the iPhone's screen will remain completely black. It will not show an Apple logo, a Recovery Mode screen, or anything at all. Your computer will detect it, but the phone itself will look like it's turned off.
Getting into DFU mode requires precise timing, and honestly, it can be a pain. Don't get discouraged if it takes you a few tries – I've fumbled the button sequence plenty of times myself.
For an iPhone 8 or newer, here’s the general process:
Connect your iPhone to your computer (with Finder or iTunes/Apple Devices open).
Quickly press and release Volume Up.
Quickly press and release Volume Down.
Press and hold the Side button until the screen turns black (if it isn't already).
While still holding the Side button, press and hold the Volume Down button for exactly 5 seconds.
After 5 seconds, release the Side button but continue to hold the Volume Down button for another 10 seconds.
Your computer should then pop up a message saying it has detected an iPhone in recovery mode, while your phone's screen remains dark.
Before you proceed, let's be crystal clear:
A DFU restore will erase everything. There is no "Update" option here. It is a full wipe, guaranteed.
DFU mode will not bypass Activation Lock. This is a fundamental security feature, not a software bug. If "Find My" was enabled on the device, you will absolutely need the original owner's Apple ID and password to activate and use the phone again after the restore. There is no way around this.
III. Hardware Check – When Software Isn't the Problem
If you've gone through Recovery Mode and DFU Mode and your iPhone is still a lifeless rectangle, it's time to face a different possibility. We need to accept that the problem may not be in the code, but in the physical hardware itself.
1. Assess Physical Damage
Put on your detective hat and give your phone a meticulous, close-up inspection. I’m talking about looking for things like:
Hairline cracks on the screen or back glass.
A slight bend or warp in the frame.
Any separation of the screen from the phone's body.
Visible damage in or around the charging port.
From personal experience and from seeing countless friends' devices, I can tell you that even a seemingly minor drop onto a hard floor can have major consequences. The impact can be just enough to dislodge a critical internal connector – like the one linking the battery to the logic board or the display to its driver – rendering the phone inoperable even if it looks fine on the outside. This is why I'm a firm believer that a decent case and good screen protectors are worth it; they're your first and best defense against the kind of impact that leads to hardware failure.
2. Check for Water Damage Via the Liquid Contact Indicator (LCI)
Now for the big one: liquid damage. It's kinda the silent killer of electronics.
To check for this, eject your SIM card tray. Get a flashlight and peer deep inside the empty slot. You're looking for a tiny sticker.
If that sticker is white or silver, you're in the clear.
If that sticker is bright, distinct red, that's the LCI. It has been activated.
That little red sticker is definitive proof for Apple technicians that the phone has been exposed to moisture. If they see it, your standard warranty is void. On virtually any iPhone from the model 5 and newer, the main LCI you can check is located right there in the SIM slot. On very old models like the iPhone 4, they were also in the headphone jack and 30-pin port.
If you find a red LCI or see clear physical damage like a bent frame, stop here. Continuing to attempt software fixes is very likely a waste of your time. The problem is physical, and the next logical step is to start evaluating professional repair options.
IV. Repair Decision: Official Apple Service vs. Third-Party Shops

So, you've tried it all. The cable swap, the force restart steps, the deep-level computer restores... and your iPhone is still a black mirror.
You've officially reached the end of the DIY road (at least for most people, that is). It's time to consider a repair by a professional.
This decision – where to take it for repair – is a big one. And it isn't just about the upfront price. It's a choice between guaranteed quality and a potential gamble that can affect your phone's future. As someone who deeply values repairability and long-term durability in my tech, this is a topic I feel pretty strongly about.
You essentially have three choices.
Path 1: The Official Route (Apple Store or Authorized Service Provider)
This is the peace-of-mind option. When you go through Apple or one of their authorized partners, you're getting the real deal. The repair is done by technicians who are certified to work on these devices, using genuine Apple parts, tools, and diagnostics.
Why does that matter? It means a replacement screen will have the exact same color accuracy, brightness, and touch response as the one your phone came with. A new battery will have the proper safety circuits and will actually report its health correctly back to iOS, so you don't get surprise shutdowns.
Yes, it's typically more expensive. And you might have to book an appointment or mail your device in. But you're paying for certainty. The repair itself is warrantied by Apple, and it won’t void any existing coverage you might have. For me, that guarantee is often worth the premium.
Path 2: The Independent Shop (The Corner Repair Store)
Look, I get the appeal. The local shop is often cheaper, faster, and more convenient. It’s tempting to just drop it off and have it back in an hour.
But this path is a gamble. It's the Wild West of part quality. That cheaper screen might have a weird blue tint, be less responsive to your touch, or drain your battery faster. That aftermarket battery might not have passed the same safety tests, or it might just die unexpectedly when it says it still has 30% charge left. The skill of the technician is also a total unknown.
And here’s the real kicker: the moment an unauthorized person opens your iPhone, any remaining Apple warranty or AppleCare+ you have is gone. Vanished. That quick, cheap fix could end up costing you a lot more down the line if something else goes wrong.
Path 3: What About Reparing It Yourself?
Alright, there's a third path, but it's not for the faint of heart: doing it yourself. This is the final frontier of tech troubleshooting, and it comes with its own set of pros and cons.
For years, this was nearly impossible. But thanks to the growing Right to Repair movement in the US and beyond, companies like Apple have been pushed to make genuine parts, tools, and repair manuals available to the public. In theory, this means you can now perform many of the same repairs as the pros, right from your own desk. It can be incredibly rewarding and save you a significant amount of money.
But let's be real. A modern iPhone is an intricate puzzle of tiny, non-standard screws, paper-thin ribbon cables, and a whole lot of tough adhesive. This isn't like building a PC. One slip of a tool, one misplaced screw, and you can turn a simple battery swap into a catastrophic logic board failure. This route requires immense patience, a steady hand, and a genuine willingness to accept that you might end up with a very expensive paperweight if things go south.
If you're still with me and feeling adventurous, you absolutely need the right tools for the job. While Apple has its own Self Service Repair store, I find their program is geared more toward seasoned technicians. For most people looking to dip their toes into DIY repair, the gold standard comes from iFixit. They've built their entire brand on empowering people to fix their own stuff.
Their kits come with everything you need for a specific repair – from the pentalobe screwdrivers to the suction handles and plastic spudgers – plus incredibly detailed, photo-rich guides that walk you through every single step. It’s the best shot you have at a successful DIY repair.
iFixit Pro Tech Toolkit

Why I Recommend It: It contains every bit, spudger, and opening tool you'll ever need for not just this iPhone repair, but any electronic device you decide to open up in the future. It’s a smart investment in your right to repair your own tech.
What to Expect on the Bill
So what kind of bill are you actually looking at? The cost depends entirely on the diagnosis.
If you're lucky and it's just a dead battery, the fix is relatively affordable, usually somewhere between $85 and $100 depending on your model.
However, for an iPhone that refuses to turn on, you have to be prepared for it to fall under Apple's "Other Damage" category. This is their catch-all for serious issues like a fried logic board or significant liquid damage. In these cases, they often don't repair your specific phone; they replace it with a refurbished unit for a flat, and often very high, fee. For a recent Pro model, this can be upwards of $600. It's a steep price that makes you seriously consider if it’s time for an upgrade instead.
You Have AppleCare+?
Now, if you have an active AppleCare+ plan, this entire decision becomes incredibly simple.
Don't even think about a third-party shop.
Your coverage is designed for exactly this scenario. Accidental damage – including the kind of internal failure that stops a phone from turning on – is covered for a small, predictable service fee or deductible. You paid for the insurance; this is the time to use it. Going through Apple is the clear, and most financially sensible, choice.
V. How to Properly Protect & Recover Your Data
Let's talk about the one thing that's truly irreplaceable: your data.
Your photos from that trip, your contacts, your years of messages, your notes. In the end, that stuff is far more valuable than the slab of metal and glass it lives on. When a phone dies, the fate of that data is often the biggest source of stress.
How to Back Up Your iPhone Properly
I’m going to say this as clearly as I can: The only guaranteed way to protect your data is to have a backup that you made before disaster struck. Waiting until your phone is dead is too late.
Thankfully, Apple gives you two excellent, easy ways to do this.
Method 1: iCloud Backup
This is the method I recommend for just about everyone. You go into your settings, flip a single switch, and your iPhone automatically backs itself up to the cloud every day, as long as it's plugged in, on Wi-Fi, and locked. It’s a seamless safety net that works in the background. You don’t even have to think about it.
Method 2: Computer Backup
For those of us who want a local copy, or who have way too many video files for a base iCloud plan (ahem, content creators), backing up to a computer is perfect. You plug your phone into your Mac or PC and make a full backup. The killer feature here, and one I use regularly, is the option to create an encrypted local backup. This saves everything, including sensitive data like your saved Wi-Fi passwords, Health data, and account passwords for websites and apps, which a standard iCloud backup doesn't touch.
No Backup Available? Here Are Your Final Recovery Options
If you're reading this and your phone is already dead with no backup, I'm going to be straight with you. Your options are limited, expensive, and come with zero guarantees of success.
Option 1: Third-Party Recovery Software
You’ll see ads for software from companies like Disk Drill or EaseUS that claim they can recover data from a dead iPhone. Let me save you some money and disappointment: these tools cannot magically communicate with a phone that has a fried logic board. They work by either finding old, forgotten iTunes backup files on your computer, or by talking to a phone that is functional but stuck in a software loop (like Recovery Mode). If your phone's hardware has failed and it won't power on, this software is not going to help you.
Option 2: Professional Data Recovery Labs
This is the absolute last resort. These are specialized labs with technicians who perform micro-surgery on your device. They can physically remove the NAND flash storage chip from the logic board and use highly specialized equipment to read the data directly off of it. As you can imagine, this is a delicate, complex, and very expensive procedure, often costing many hundreds or even thousands of dollars. This is the option you choose only when the data – irreplaceable baby photos, critical business documents – is truly priceless.
VI. Prevention: How to Keep Your iPhone from Getting to This Point

Okay, so hopefully, you’ve managed to revive your iPhone from the brink. It’s back on, and all is right with the world.
Now, let's talk about how to avoid ever having to read this article again.
As someone who prefers to buy tech that lasts, I believe a little preventative maintenance goes a long way. It's not only about avoiding the panic of a dead device but also about getting the most value and lifespan out of the things you own.
1. Take Care of Your Battery
Your iPhone's battery is a consumable component. I like to think of it like the tires on a car – it will inevitably wear out over time. But how you treat it has a massive impact on how fast that happens. If you've noticed your phone battery dying so fast, there are several habits you can change to extend its lifespan significantly.
Avoid Extreme Charges
Lithium-ion batteries are happiest when they aren't totally full or totally empty. Routinely draining your phone to 0% or leaving it plugged in at 100% for hours on end (like overnight, every night) puts stress on the battery and accelerates its aging. When you can, try to keep it living within the 20% to 80% range.
Let Your iPhone Help
Even better, let the phone manage this for you. Go to Settings > Battery > Battery Health & Charging and turn on Optimized Battery Charging. Your iPhone will learn your daily routine. It knows you usually unplug your phone around 7 AM, so it will hold the charge at 80% for most of the night and only finish topping it up to 100% right before you wake up. It’s a brilliant, set-it-and-forget-it feature that genuinely helps.
Avoid Extreme Heat
Heat is the number one killer of battery health. Period. Leaving your phone on a car dashboard in the sun is a death sentence for its long-term capacity. As a content creator, I notice this when my phone gets warm during longer shootings in direct sunlight. If you feel your phone getting hot while gaming or charging, just popping it out of its case for a bit can make a real difference.
2. Protect Your iPhone’s Hardware and Software
This is the simple stuff that can make a real difference.
First, keep your software up to date. I know, it's boring advice, but those iOS updates from Apple contain critical security patches, important bug fixes, and often, power management improvements that can help with stability.
Second, invest in physical protection. I love the clean, minimalist design of a caseless iPhone as much as anyone. But I also know that one clumsy drop can cause the exact kind of invisible internal damage that leads to a dead phone weeks later. A high-quality, shock-absorbent case and a good screen protector are not expenses – they're a smart investment in your device's survival.
Final Thoughts
Look, a dead iPhone is stressful, but it's rarely a lost cause.
The key is to work through the problem methodically – power, software, hardware – without panicking. More often than not, the fix is simpler than you think. And if it turns out to be a serious hardware problem, now you know exactly what your options are, what the risks are, and what to expect.
Hopefully, these steps have armed you with the confidence to tackle the problem head-on.
I’m curious to hear your own stories. Have you ever brought an iPhone back from the brink? What ended up being the fix? Drop your experiences in the comments below – your story might just be the one that helps another reader out.
And if you appreciate this kind of no-nonsense tech analysis that focuses on durability and real-world use, consider subscribing to my monthly tech newsletter. I go deeper on topics like this one, share reviews on gear I'm actually testing, and cut through the marketing hype to help you make smarter decisions. No spam, just solid tech insights.
Thanks a lot for reading, and see you in the next one!


FAQ
-
Ah, the dreaded boot loop. I've seen this countless times. It's a classic sign that something in the main operating system (iOS) is corrupted, often after a failed software update. Your best bet is to connect the phone to a computer, enter Recovery Mode, and be sure to select the "Update" option first. This will try to fix iOS without deleting your data.
-
This is what I call the "zombie phone" – the screen is black and unresponsive, but you might still hear sounds or feel vibrations. It's almost always a fatal software crash where the system is running but can't activate the display. The very first thing you should try is a force restart. It works like a digital defibrillator and often jolts the phone right back to life.
-
This is a major red flag. Unplug it immediately. A phone that gets unusually hot while refusing to power on often points to a short circuit on the main logic board, likely caused by a drop or liquid damage. It's a serious hardware issue. Continuing to feed it power can cause even more damage. Take it to a professional for diagnosis.
-
Let's settle this once and for all: the rice trick is a myth, and it's a bad one. Rice is a terrible desiccant and does almost nothing to absorb moisture from deep within the intricate electronics of an iPhone. Worse, tiny grains of rice, dust, and starch can get into the charging port and other openings, causing more harm than good.
The correct procedure for a wet phone is to power it off immediately, do not charge it, and take it to a reputable repair shop for an internal cleaning as quickly as possible.
-
You've run into Activation Lock, Apple's powerful anti-theft feature. It is fundamentally tied to the original owner's "Find My" service, and there is no software method or restore process that can bypass it. You must have the original owner's Apple ID and password to proceed. If you bought the device secondhand, you have to contact the seller. If you are the original owner, you can ask Apple for help by providing them with the original proof of purchase.
-
That's a great question, and the key is to use your other senses. First, try flipping the silent switch (or press the action button) on the side of the phone. You should feel a small vibration if the phone is on. If that doesn't work, plug it into a charger you know is working. Even with a dead screen, you should hear the distinct charging chime when it connects to power. If you hear or feel signs of life but the screen remains black, then you're likely dealing with a hardware issue – either a dead display or a disconnected cable inside.
-
This is the scenario we all hope to avoid. If the "Update" process fails, it usually means the software corruption is too deep for a simple repair-install. Your only remaining software-based option is to try again, but this time, you have to select "Restore." I can't stress this enough: this is the point of no return for your data. The "Restore" option will completely wipe your device. If you have a backup, you can get your data back later. If you don't, everything on the phone will be permanently erased.
-
Excellent job troubleshooting. If cleaning the port didn't work, the next step is to isolate the problem by testing the other components in the charging chain. Don't just assume your cable is good – find another known-working, Apple-certified cable and power adapter and try those.
Also, try a completely different wall outlet or a USB port on a powered-on computer. If you've tried a different, fully tested charging setup and there are still no signs of life, then the problem is almost certainly internal to the phone itself, like the battery or the port's connection to the logic board.
-
"Break" is a strong word, but it can definitely cause problems. Apple practices what's called "parts pairing," where the iPhone's software can check if components like the screen or battery are genuine. Using a non-genuine screen from a third-party shop can lead to warning messages in your settings or cause features like True Tone to stop working after an update. While it's rare for an update to completely brick the phone due to a third-party part, it's a real risk that you lose functionality. It's one of the main reasons I'm skeptical of non-authorized repairs – you might save money upfront but lose out on a fully functional device in the long run.
-
Take a deep breath – it's almost certainly not bricked forever. This is actually one of the most common reasons a phone gets stuck and needs a manual restore. When an update is interrupted (by a power loss, for example), it leaves the operating system in a broken, half-installed state. This is precisely the kind of problem Recovery Mode was designed to fix. Follow the steps to connect it to a computer and enter Recovery Mode. It should be able to finish the installation or restore the phone to a working state.